Saturday, October 25, 2014

Unity3D Visual Scripting with Mecanim

As the indie game development scene grows more and more inexperienced programmers come in and try to grab ahold of the ropes, learning the engine, scripting languages, animation, and so on. Most of the aspiring game developers usually start out as artists who have no idea where to start when it comes to programming. I believe this is the reason that many cheap visual scripters have been showing up. Aside from speeding up production and making communication between programmers a little cleaner, it allows the ignorant enthusiast to ease them self into the practice of game programming.

This article is to demonstrate how to use Unity's animation system double as a visual scripter.

Although we will still be making a script, it only consist of three functions, and the longest one is only three lines of code. In this 2D project I created a turret that I want to start firing when the player reaches a certain distance from the turret. You could also use triggers, raycasts, etc, but for this tutorial I chose the simplest possible.


Let us begin with just hanging up our variables. Our Lazer Turret will create a GameObject of our lazer that already has a script on it. All the lazer's script does is have it use a "Move Towards" command to make it more and a script on it that handles the health and damage items of the project (that is not for this tutorial.)


Now lets set up our Start Function. Here we assign what the target will be, which I want to be the Player. I use "FindGameObjectWithTag" because it is just more general, so in case I have multiple characters that have different names this line will always find who it needs to. And also here we create link our public variable to the speed in which the Animator plays. This will become clear in a moment.


Now, our Update Function, which updates every frame. The first line is in case the script was not able to access the target at the start of the level. This might happen if you spawn your character into the scene instead of placing it in through the editor. Next, I assign my float value distance to the amount of distance the player is from the turret. Then I pass that variable into the Parameter in the Animator named "Distance."


Next we have our Function Shoot Lazer. Here all we do is create our lazer bullet prefab. We have no conditions scripted into the script, all we are doing through out the script is collecting data. Mecanim is going to actualize it for us.


I also have this function that literally is just a place holder.


 Here is our Animator Controller with two animations in it: Idle and Shoot. You can see in the bottom left corner the Parameter "Distance." I you remember, in our Update function. We wrote a line that passed info through to the animator. That value was the distance that the player was from the turret.


Here out animation has no keyframes aside from the Animation Events which call the functions fro our LazerFire Script. To add these just right click in the top, grey area in the time line and select "Add Animation Event" then choose the one you wish to call. I call the ShootLazer Function near the end to enact that function. Some times when animations blend into each other the function could be skipped if it is at the end of the animation, so I used the PlaceHolder Function to make the animation longer to avoid this problem.


 So our information from the script we made a transition from Idle to Shoot that happens only when the value of distance is less than three. For transitioning back to Idle we use the same information just reverse it from "lesser than" to "greater than."

 Here is our inspector where we can change all the needed information. Before I wrap up, I want to re address a particular line of code.

anim.speed = fireRate;

This line changes the speed of the entire Animator Controller, not just one animation. Keep that in mind. If you want to change the speed of a certain specific animation, there are a couple of ways to do so which you can find in the Scripting Reference on unity's website.

Although we still did dive into some script, we used very basic coding to create a very customizable object. Mecanim can be used for easing many more processes and can be used to create very elaborate event systems without having to type much code or having to send message after message through out your scripts.

If this tutorial was helpful, or any other we have created, please visit support.TakeThisStudios.com where you can get access to much more information and get ahold of any Game Assets you require. Such as this source files for this tutorial. If you like the efforts we try to achieve, then please consider donating some pocket change to help further our goal of providing resources and asset for developers.

If you ever wish to see more, then just visit our Official Site!

Thank you very much!


Wednesday, October 15, 2014

Unity Character Controller C# (Tutorial)


The most basic and needed asset for any game, in which you control an avatar, is a script to control your character. In this tutorial I will demonstrate and explain how to build a character controller.

There are a few thing that you want to decide before you start working on your script. What kind of movements will I need? Can it run, jump, attack?

In this tutorial the controller I will create will allow the player to walk, run, jump, bounce, and attack, all while playing in a sidescroling environment. This script communicates with Unity's built in animation tool "Mechanim." The player gameobject requires a collider, rigidbody, and an animator.

Terms Used Frequently:
public - can be accessed from other scripts and can be edited in the inspector.
float - Number variable that allows decimals. Ex 1.251 or 576.6574893.
bool - A value that only holds true or false.
LayerMask - a type that you can assign particular layers to in Unity.
Transform - represents a specific point in 3D or 2D space.
GameObject - pretty simple.


 This is what your Script will start with. Make sure that your script's file name is the same as the "public class" name.


As our first variable, lets make a Boolean value. We want to make this so that in the situation where we want to make the player unable to control the avatar, say for a cut scene or on death, we need this here so we can do so.


Here are the variables that we will need for movement. You can change these at any time here in the script or in Unity's inspector.

The running variable does not control anything in the script, however, we use it to communicate with the Animator. Same with the xSpeed. I will explain those later.


We start the player off with grounded being false because I have the player slightly above the ground at the start of the level. If you try to place it on the ground to start in the editor, you risk clipping issues and the player falling straight through.

The Transform groundCheck is an empty GameObject that is in the avatar's hierarchy. Place it near the feet, or where ever the player would touch the ground. the float groundRadius is the range it takes from the groundCheck to detect ground. The LayerMask whatIsGround is the layer(s) that we declare as ground to detect.

The floats and bools after are not set at a certain value in the script because they require so much tweaking, so I set them in the editor. the bool jumped is used later when checking if the player is off the ground because it jumped or if it fell. Then I am sure you understand the bounce stuff is kind of the same.

My player uses fireballs as his attack. This tutorial does not show how to perform the attack, that will be another tutorial, however, this does give the very basic setup for it.

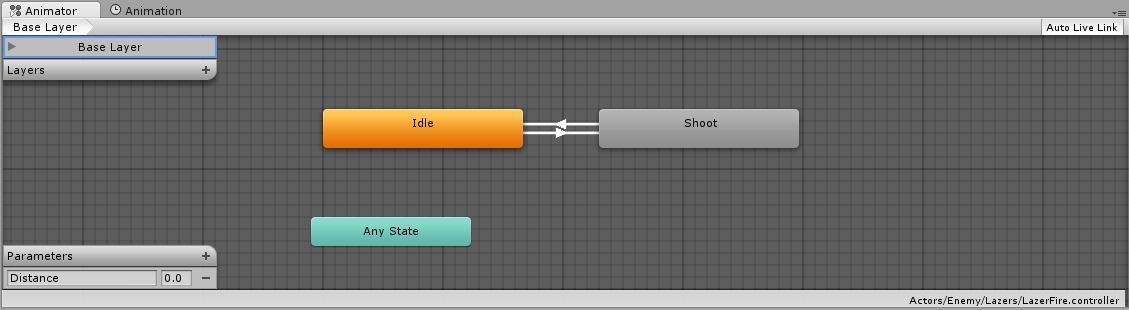
As stated, you will need an Animator component. Here the Animator anim is set up also where the variables are placed. Now when we want to do something with the animator we only have to use anim to call it.

In the start function we want the script to recognize that the anim is in fact the Animator. You could just make the anim public and drag and drop the GameObject in the inspector, but this way my object's inspector is clearer.


Most of our script will be housed in the FixedUpdate function. This function is best for working with physics (which is how we will move our character) because unlike the Update function, FixedUpdate does not update every frame, it refreshes at a steady pace regardless of the frame rate.

The first line is used to set the rotation of our character. The angle variable is the key to which way our character is facing. With using Vector.up unity will set the rotation based off of the "up" axis. In this case it is the -y.

In the second line we make the float value move equivalent to the Input value of the axis labeled "Horizontal". In the Project Settings > Input I made my "Horizontal Axis" based off of the joystick X-axis. So now, whenever the player moves the joystick along the x-axis, we will return an input value of -1 to 1. This will be used to tell Unity which direction to apply force to.

xSpeed is equal to the amount of velocity the player is moving along the -x axis. The xSpeed and running variable are used for Animation purposes. When animation your player for movement, you do not want the movement input joystick to tell the animator to play the walking animation. Instead it is best to see if the player is actually moving. This way when you run into a wall and stop moving, your character will not be playing the walking animation.

The bool running is used when we want to pass info to the Animator, telling it whether we are running or not running.


Still in the FixedUpdate function, I have these lines of code so that I can tell my animator to perform certain things. This is not a tutorial for Unity's Mechanim, you can find that elsewhere.


All of these are fairly simple to understand. I'll explain the first one and then you should be able to comprehend the rest.

If float move is greater than 0.1 (which would happen if the player moved the Horizontal Joystick along the positive -x axis) and if the player is not running (that's what "!" means if it is in front of a Boolean) and the player can be controlled, then we will apply velocity to the gameObjects rigidbody.

In the Vector3, the values inside the "()" are the x, y, and z axis. When working with a Vector3, you do not always have to include the -z axis. In this situation, we are applying force along the -x axis based on the value of float move. We do not wish to apply force along the -y axis so we just type "rigidbody.velocity.y" meaning that whatever amount of velocity it has in this frame, it will continue to have.

When my character moves along the positive -x, he is facing right so I need to make him face right which would put him at 90 degrees along the -y axis. And since I am moving without running, I put the bool running to false.

Now translate that logic to figure out the others.
 

Here we can give the player the ability to jump and bounce off of objects or enemies.
 
If the player is grounded (which we will determine later), then the bool jumped equals false.
 
If the player is grounded and the player presses the button that we assigned for "Jump" (Project Settings > Input) and if the player canControl, then we will apply force. Just like how we applied the movement force with the Vector3, we can do the same here with a Vector2(x,y).
 
So we apply force with 0 along the -x, and then we use the equation jumpForce *(times) 100. You can tweak this however you want using the inspector to set the float jumpForce. You do not even have to multiply by 100, I only do so to keep my inspector value cleaner.
 
Then we set the bool jumped to true. We will use this to tell our animator that we have jumped and not fallen.
 
The bounce brick of logic will make sense after I show you the way we are going to check for grounding.


As I said, this tutorial does not show how to make an attack, there are too many different kinds and ways to do them to explain here. This piece of code checks if the player has hit the attack button and if the player is in the process of attacking or not.


Now we can get to checking if the player is on the ground. We made several variables and components at the beginning of the script:
  • bool grounded
  • Transform groundCheck
  • float groundRadius
  • LayerMask whatIsGround

This line of code is placed in the Update function, which updates every frame. It could reside in the FixedUpdate, although I ran into many bugs with it not detecting my player touching the ground quick enough which messed with my ability to jump again.

The bool grounded is equal to a specific condition. Physics.CheckSphere is the ability to create a sphere from a particular position and gather information with what it touches.


Physics.CheckSphere (where to check from, how far to check, what layermask);

So as long as the CheckSphere that originates from the Transform of the empty GameObject that I placed in the hierarchy touches objects that are under the layers I decide in Unity's inspector, the player will be considered grounded.


These functions are here in case I want to send a message from one script to this one to declare the player as controllable or not.


I hope that this helped at least a few people.  If you are new to programming or to Unity, it maybe wise to read over it again to make sure it sticks.

Source File Here

Tuesday, October 14, 2014

Ghost in the Machine (Indie Game)

Disclaimer: These reviews are the opinions of the author and do not reflect the opinions or values of Take This Studios LLC.
Ghost in the Machine is a retro game for the modern era. A 2D platformer that is heavy on the platforming. Available for PC, Mac, and Linux on itch.io for $5.00.

Your avatar looks as though he is the spawn of ancient 80's program and the Nintendo Gameboy. In the year 20XX the player has become trapped in a factory decades old, and I am pretty sure that the factory manufactures death. As you play though the platform heavy, spike stabbing, weight crushing levels you pick up special wrenches with the mysterious power to reveal why exactly you are trapped in this factory.

Although this could seem like the typical pixel platformer, it surely should not be treated as such. The art for the game, like I typed about the avatar, is a tasteful reflection to much older systems and the game mechanics a reflection of that as well. However, even though the art mimics ancient technology, it feels completely modern as if it were targeted to a much younger audience just like it is for the OG's (Original Gamers). Also, the controls may be simplistic, the level design is flawless and shows that the designers paid much attention to detail.
 
The engine was also built from the ground up so that the creators could make sure that their product was exactly what they envisioned, which is always worthy of recognition.

 Overall Rating:
My rating system works a little differently. I do not go with the "Star System" nor "1 through 10". I rate games based off of the price point and what I think the game is worth compared to it.
Replay Value
$5.00 I would say that the replay value is there for the right price. Collecting the secret items and making it to the end of the level is not something done lightly.
Gameplay
$5.00 The gameplay is well worth the listed value. It plays fluidly and is a great new age, retro experience.
Target Audience
$5.00 They hit it spot on with their audience. It is perfect for retro lovers. The controls are so easy for anyone to pick up and it is challenging enough to keep the hardcore gamer enthralled.
Art
$10.00 A great crisp experience with the art style. The music is what really brings it all together. Completely synthesized using old handheld game sounds. Fantastic!
Total
$6.25 I would say that the creators are giving a very modest price at $5.00. This Is worth the buy!

Conclusion
The only thing extra I wish for this game is that it could come to the Nintendo 3DS. I would love to play this when about and about. To mention one more thing, the creator is planning on releasing a level editor so that players can make their own levels and share them with each other. Can't wait for that feature.


Monday, October 13, 2014

Paper Runner (Indie Game)

Disclaimer: These reviews are the opinions of the author and do not reflect the opinions or values of Take This Studios LLC.
Paper runner is vibrant 2D sidescrolling runner game available for free on the Windows 8.1 Store.  It was created using the Construct 2 Engine, a software targeted largely at game artist more so than hard coding school programmers even though it is expandable with writing code in JavaScript.

The art for this game is whimsical and adorably child like. You play as the imaginary stick figure stick figure that exists in every school-goer's notebook who roams around the treacherous forest fighting monsters and trekking villainous terrain dotted with sharpened pencils and paper punchers. The music for the game generates an atmosphere that presents an environment for creative flow.

I brought up Construct 2 Engine for a reason. That engine, as well as several other similar tools are starting to allow Game artist who may not have the opportunity to develop programming skills to jump in on the game making arena. These packages and tools become invaluable to the Game Dev scene as a whole. The reason being is that  the more artist that become active in game development, the more unique art styles we can really see make an impact. With that being the case, the indie crowd can really begin to have a much stronger voice on the gaming market.

As stated, this game is free for the Windows Store, so if you have a 8.1 PC, go download this game and give it a whirl for sure.

Windows Store Link

Saturday, October 11, 2014

SinaRun 2 (Indie Game)


Disclaimer: These reviews are the opinions of the author and do not reflect the opinions or values of Take This Studios LLC.

SinaRun 2, created by Princesseuh, is…well… a 3D platformer in its purest form. That might sound like it is the embodiment of what Indie game is about, but it also could mean a lack of innovation. While judging this, I ran into a lot of grey area. It is available on Itch for $1.99 USD.

The creator uses this as the opening line to the sales pitch: "
SinaRun 2 is a minimalist 3D platform/racing/runner game."

 SinaRun 2 definitely is a challenging and engaging race to the finishes using very strategic jump timing and anticipation of the velocity at which you move. Many a time I started out dying after the first jump. With no exaggeration, it look me 48 deaths to beat the first level. It is an amazingly addictive game! Every level is worth playing again even if you have beat it. There is no one path to finish and each course provides a "Dev Time" to try to beat.

As a runner/3D Platformer, this game has hit it spot on. However, as far as the description of a minimalist art style, I have to say that said description is being too generous. Minimalism is a legitimate form of art that actually consists of many different elements and it by no means should be called "basic" art. This games art style is basic, not minimalist. It would actually be more accurately stated as having a lack of art.
 
This is my main problem with the game: Indie games will not betaken seriously on the gaming market until these things happen: (1)Indie Games that charge should show clear and distinct uniqueness from AAA titles that makes them desirable. This uniqueness could be accomplished by creating a (or many) gameplay mechanic(s) that make the experience stand out. (2) Indie games that charge, especially with small teams, have the chance to develop an art style that is unlike any other. Even if the gameplay is a typical experience, the art can make a player perceive it in an entirely new fashion.

SinaRun 2 is not a unique experience per se, and it has no art in it. Not to be harsh, but it seams as if it could be completed in a few days max. All of the objects in the level are basic geometrical volumes, so level creation (not design) would have taken no more than an hour for each level (which there are only five of). The movement uses the basic in-engine physics (looks like Unity) and a basic Character controller script (perhaps Unity's Built-in Controller). Then throw some in-engine fog and then different ambient light colors and the game is finished.

Since I have now torn it down, let me try to build it back up. The creator does promise additional content in the future such as more levels, game modes, and general content. So perhaps this game could get the polishing it needs to make it a title worthy or charge. And to say again, it is very addictive and engaging.
 
Overall Rating:
My rating system works a little differently. I do not go with the "Star System" nor "1 through 10". I rate games based off of the price point and what I think the game is worth compared to it.

Replay Value
$0.50 It is replay-able in many ways, however, there are only 5 levels to chose from.
Gameplay
$0.50 The game play is pretty fluid for what you are playing, however you can not control your avatar with a joystick which is actually more important that you would think, since you move and accelerate your movements at such a fast pace. And there are no unique features about the gameplay. (There is a multiplayer option for the game, however, I could not use it, whether it is lack of community or the feature is broken)
Target Audience
$0.50 The target demographic for this title is unsure. In my opinion, the game is too casual for what most people would spend their time with on their PC. If this were for mobile then the audience would make much more sense and would be much more enjoyable.
Art
$0.00 Like I said before, there is no art.
Total
$0.38 Is the pricing I would suggest.

Conclusion
The game is fun, and has the potential to be great even. Make a few textures or find an artist to collaborate with for a small fee or small percentage and that would bump up the value right there. Add about 15 more levels and bring it to mobile devices and the game would totally be worth the $1.99, actually even more than that. Best of luck!

Purchase Page

Friday, October 10, 2014

Velocibox (Indie Game)

Disclaimer: These reviews are the opinions of the author and do not reflect the opinions or values of Take This Studios LLC.
"Velocibox is a twitch-heavy action game crafted for the hardcore audience." That is what there Itch page uses as it opening line of description, and it sure is accurate. Although it falls under a common play style in the arcade genre, it feels completely unique and new to the gaming scene.

What is it?
You play a Mr. Cube, or whatever you choose to name your avatar, an you are constantly falling or running down an enormously long hallway avoiding the obstacles on the walls, ceiling, etc. While doing so you collect little item that are placed in the midst of the obstacles. These little guys are the root to the high score system. Like I said, it falls under a very common play style, however, keep reading to see why it is also a very unique game that is worth you playing time.

 
Unlike other high score game, this is not tailored to the casual player. After the tutorial level, it becomes very difficult to keep up with the pace of the game. Mr. cube moves about extremely fast down this hallway and it becomes very hard to anticipate your next move. Another distinguishing element is the lack of ability to acquire muscle memory for each level. Every time you die, which is close to around a thousand times, the level regenerates it obstacles and point pick up thingies in completely random places and patterns. This game will definitely keep your mind scattered and will make you hate your fingers for not having the god like ability to react before your brain does.

I am a sucker for minimalist art styles and this game does an amazing job a providing a visually appealing game. Now just because I say minimalist, that does not mean I am saying basic. Everything is very crisp, vibrant, and full on HD which is nicely complemented with awesome, trippy, modern looking screen FXs.

This game goes for 5.00 on Itch.io. Even though I find this game to be quite enjoyable, I am uncertain I could recommend this game to everyone with the price point it is at. It is not a game for everyone and that, I am sure, is a driving factor for the price point. With a game of this genre to be so challenging, you have a small market of Indie Gamers. However, I would suggest to everyone to download the free demo to make sure you like it, and that you will not bash your face into your keyboard from furry.


Overall Rating:
My rating system works a little differently. I do not go with the "Star System" or "1 through 10". I rate games based off of the price point and what I think the game is worth compared to it.


Replay Value
 $5.00 Being a High score game, you never truly beat it until you have satisfied yourself or are on top of the leaderboard
Gameplay
$3.00 It is "too" challenging of gameplay for some to experience the entire game. Improvements would be to add some difficulty setting to try to help newer players.
Target Audience
$5.00 Being a game with a very select audience, and advertising it as such really helps redeem the difficulty problem.
Art
$5.00 The style is very consistent and through out and you can definitely see that a lot of creative work when into making the visual aspects of the game great.
Total
4.6 is a pricing I would suggest. The full price is $5.00. So, not too shabby at all!

Conclusion
The fact the creators offer a free demo really shows their confidence in their product. I would love to see this game ported over to the three Mobile Platforms. If I could see this on my phone, I would buy it in a heart beat.